I’ve noticed that youth baseball teams waste an average of 12 minutes per game searching for misplaced equipment in disorganized dugouts. As someone who’s coached Little League for over a decade, I’ve developed several proven DIY dugout organization systems that’ll transform your team’s space from chaos to efficiency. From simple PVC bat racks to weather-smart storage solutions, I’ll share how you can create a professional-grade dugout setup for a fraction of the retail cost.
Essential Materials and Tools for DIY Dugout Storage
A successful dugout storage project starts with gathering the right materials and tools before diving into construction.
I’ll help you select durable storage bins that can withstand weather and rough handling while keeping equipment organized and protected. You’ll need weather-resistant plastic containers, heavy-duty bungee cords, and non-slip rubber matting for the base.
For tool selection, I recommend having a cordless drill, measuring tape, level, pencil, and safety glasses on hand.
I always include zip ties, mounting brackets, and rust-resistant screws to guarantee everything stays secure during games and practice.
When choosing materials, I focus on items that are both sturdy and lightweight, making it easy to transport and rearrange the storage system as needed throughout the season.
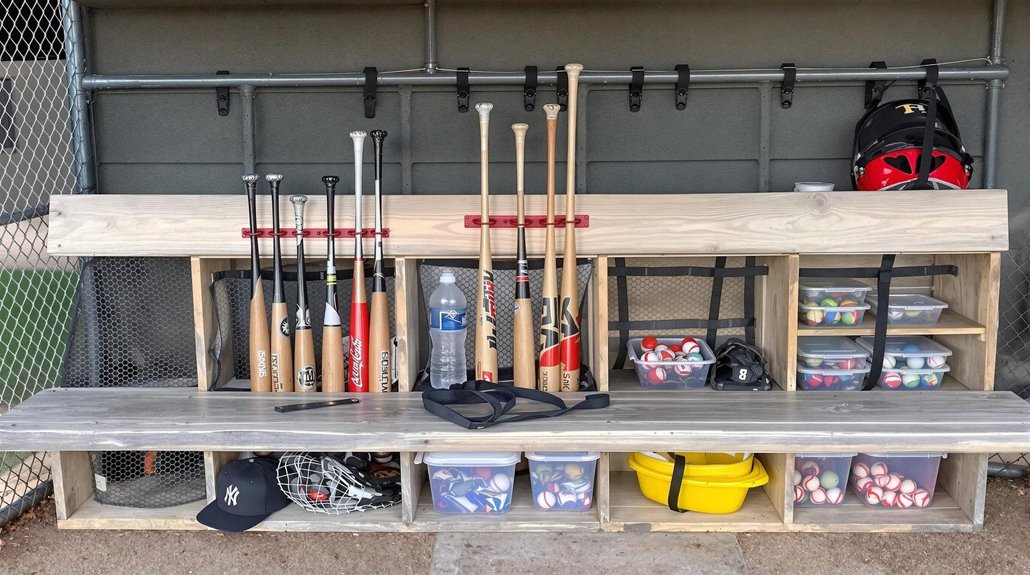
PVC Pipe Bat Rack Design and Assembly
While building a PVC bat rack might seem intimidating, I’ll show you how to create a durable, professional-looking storage solution using affordable materials from your local hardware store.
When it comes to pvc pipe durability, I’ve found that 2-inch diameter pipes work best for this project. I’ll help you build a rack that’ll keep your team’s bats organized and protected all season long.
The standard bat rack dimensions I recommend are 4 feet wide by 3 feet tall.
- Measure and cut your PVC pipes carefully, ensuring each slot is 4 inches apart to prevent bats from hitting each other.
- Use strong PVC cement on all joints to create a sturdy structure that won’t wobble.
- Add rubber caps to pipe ends for enhanced safety and protection.
- Install the rack at a comfortable height for all players to reach safely.
Hanging Helmet Organization System
Since dugouts can quickly become cluttered with helmets scattered everywhere, I’ve designed a simple hanging system that’ll keep your team’s gear tidy and accessible.
I recommend installing heavy-duty wall mounted hooks along the dugout’s back wall, spacing them 12 inches apart at shoulder height for your players. You’ll want to secure each hook with proper anchors to guarantee they can handle the weight of multiple helmets.
For helmet display options, I suggest using J-hooks or sturdy coat hooks that have a protective rubber coating to prevent scratches.
Be certain to label each hook with player numbers or names, and always check that the mounting height allows your youngest players to reach their helmets safely. This organized approach prevents helmets from rolling around and becoming tripping hazards.
Portable Equipment Storage Solutions

Because dugout space comes at a premium during games and practices, I’ve developed several portable storage solutions that’ll keep your team’s equipment organized and mobile.
These lightweight solutions help maximize limited space while ensuring equipment stays protected and accessible.
Here are my favorite compact storage options that I’ve tested with my own team:
- Rolling equipment cart with removable bins – perfect for bats, helmets, and catching gear
- Collapsible mesh bags with shoulder straps – ideal for balls, gloves, and practice gear
- Wheeled bat rack with integrated helmet hooks – combines storage with easy transport
- Folding PVC storage rack – creates instant dugout organization that breaks down flat for travel
I’ve found these solutions work especially well when you’re dealing with cramped dugouts or need to transport gear between fields.
Weather-Resistant Gear Protection Tips
When harsh weather threatens your baseball equipment, you’ll need reliable protection strategies to keep everything dry and game-ready throughout the season.
I’ve found that investing in quality weatherproof covers for your dugout storage containers makes a huge difference in protecting gear from unexpected rain and moisture.
I recommend creating moisture barriers by lining the bottom of your storage bins with heavy-duty contractor bags, which provide an extra layer of protection against ground dampness.
You can also install a sloped plastic sheet above your storage area to direct water away from equipment.
For added protection, I place silica gel packets in equipment bags and store leather gloves in sealed containers with moisture-absorbing materials, ensuring they’ll stay dry and ready for the next game.
Space-Saving Bench Storage Ideas
While dugout space often comes at a premium, I’ve discovered several clever ways to maximize bench storage without compromising player comfort or gear accessibility.
When considering your bench layout, make sure you’re thinking vertically as well as horizontally for ideal storage aesthetics.
- Install adjustable hooks under the bench seats to hang helmets and bags, keeping them off the ground and organized for quick access.
- Create pull-out drawers beneath the benches for balls, extra gear, and first aid supplies that you’ll need within arm’s reach.
- Mount collapsible shelving units on dugout walls that can fold flat when not in use.
- Use labeled storage bins that slide neatly under benches, ensuring everyone knows exactly where their equipment belongs.
Team Equipment Management Strategies

Although managing team equipment can feel overwhelming at first, I’ve developed a systematic approach that keeps our gear organized and readily available throughout the season.
I recommend starting with a color-coded labeling system for bats, helmets, and protective gear, making it easy for players to find their equipment quickly.
I’ve found that creating a shared digital spreadsheet for team communication helps track who’s responsible for bringing specific items to each game.
You’ll want to integrate this with your practice schedules, ensuring everyone knows their equipment responsibilities.
I always designate specific team parents as equipment managers who can help maintain our organization system and perform regular safety checks on gear.
Remember to include backup equipment in your organizational plan for those inevitable moments when something breaks or goes missing.
Customizing Organizers for Different Age Groups
Since different age groups have unique needs and capabilities, I’ve learned to adapt dugout organization systems based on the players’ developmental stages. I focus on age specific designs that keep safety and accessibility as top priorities while incorporating youth focused features that make organization fun and intuitive.
- For T-ball and coach-pitch (ages 4-7), I use color-coded bins at ground level with picture labels, making it simple for little ones to find their gear independently.
- In kid-pitch leagues (ages 8-11), I install mid-height hooks and cubbies that teach responsibility while keeping items within easy reach.
- For pre-teens (ages 12-13), I create designated zones with name labels and equipment checklists.
- In advanced youth leagues (14+), I implement professional-style locker systems that prep players for high school ball.