


How to Clean a Trumpet Mouthpiece for Better Sound and Hygiene
I’ve spent years maintaining brass instruments, and I can tell you that a clean trumpet mouthpiece is essential for both your health and sound quality. When you’re blowing into your horn, you’re actually depositing saliva, food particles, and bacteria that can affect your playing experience and potentially make you sick. Let me share my proven cleaning methods that’ll help you keep your mouthpiece in pristine condition and your trumpet sounding its absolute best.
Why Regular Mouthpiece Cleaning Matters

When you play your trumpet regularly, bacteria and debris from your mouth naturally build up inside the mouthpiece, creating an environment that’s both unsanitary and potentially harmful to your performance.
I’ve found that consistent mouthpiece cleaning offers significant hygiene benefits, protecting you from inhaling harmful bacteria that could lead to respiratory issues or infections.
Beyond the health aspects, I can assure you that a clean mouthpiece delivers noticeable sound improvement, allowing your instrument to resonate more clearly and respond better to your playing technique.
As someone who’s worked with countless trumpet players, I know that neglecting mouthpiece maintenance can result in reduced airflow, compromised tone quality, and even permanent damage to your expensive equipment.
That’s why I recommend making mouthpiece cleaning a fundamental part of your practice routine.
Essential Cleaning Supplies and Materials
Before you begin cleaning your trumpet mouthpiece, I recommend gathering a few essential supplies that’ll make the process quick and effective.
You’ll need warm water, mild dish soap, a dedicated mouthpiece brush, and a soft microfiber cloth from your cleaning tools collection.
For thorough maintenance supplies, I suggest having a small bowl for soaking, a cleaning snake or flexible brush, and a gentle brass polish specifically made for musical instruments.
I always keep hydrogen peroxide on hand as an optional disinfectant, but be sure to dilute it properly.
Don’t forget to have a clean towel ready to lay out your supplies on, and keep paper towels nearby for any spills.
With these items prepared, you’re ready to start the cleaning process safely.
Daily Quick-Clean Method
Now that you’ve got your supplies ready, I’ll show you my daily quick-clean method that only takes a few minutes but keeps your mouthpiece in top condition.
After each practice session, I give my mouthpiece a quick rinse under lukewarm water to remove saliva and debris that can build up during playing.
I’ll take a clean microfiber cloth and do a thorough daily wipe of both the cup and backbore, making sure to dry every surface completely.
Never skip drying, as leftover moisture can lead to bacteria growth.
For the small end that connects to the trumpet, I use a thin cleaning cloth to carefully dry inside the shank.
This simple routine prevents grime buildup and helps maintain consistent sound quality between deep cleanings.
Deep Cleaning Steps and Techniques

Three essential steps form the foundation of a proper deep cleaning routine for your trumpet mouthpiece: disinfecting, scrubbing, and polishing.
I’ll show you my tried-and-true deep cleaning techniques that’ll keep your mouthpiece in excellent condition.
First, I recommend soaking your mouthpiece in a mixture of warm water and a specialized brass disinfectant for 15 minutes.
Next, I use a mouthpiece brush to thoroughly scrub the inside, paying special attention to the throat and backbore where bacteria love to hide.
Finally, I polish the rim and cup with a microfiber cloth to restore its shine and remove any remaining deposits.
For ideal mouthpiece care, I suggest performing this deep clean monthly, or more frequently if you’re playing daily or sharing your instrument.
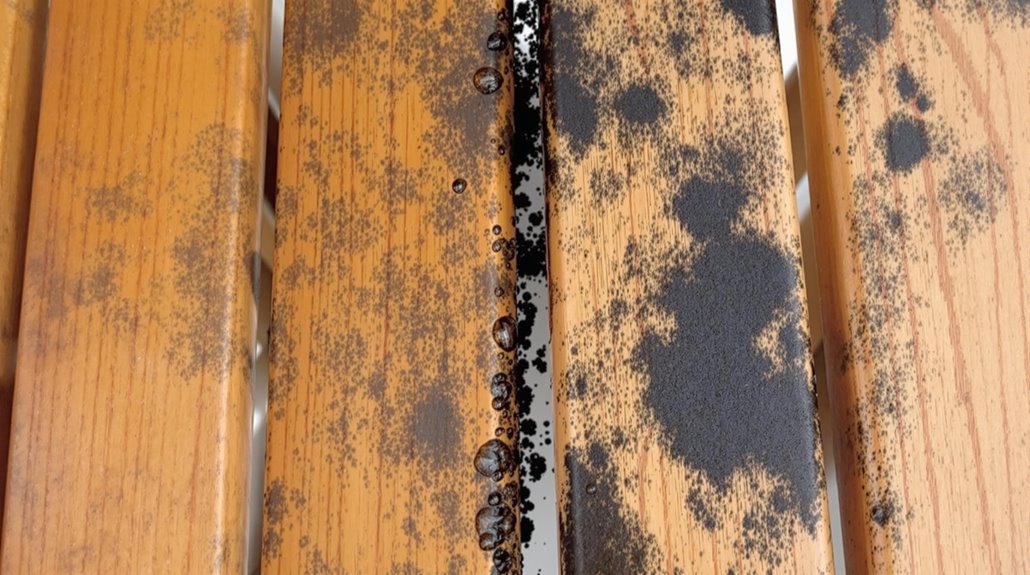
Removing Stubborn Calcium Deposits
While regular cleaning helps prevent buildup, stubborn calcium deposits can still form on your trumpet mouthpiece, appearing as white, chalky patches that won’t budge with normal cleaning. I’ve found that removing these deposits requires specific cleaning solutions and techniques to restore your mouthpiece’s shine.
| Solution Type | Soaking Time | Effectiveness | Safety Notes |
|---|---|---|---|
| White Vinegar | 30 minutes | Moderate | Very safe |
| Lemon Juice | 1 hour | Good | Natural option |
| Calcium Remover | 15 minutes | Excellent | Use with care |
| CLR Solution | 5 minutes | Superior | Rinse thoroughly |
I recommend starting with vinegar or lemon juice since they’re gentler options. If the calcium buildup persists, you can try commercial cleaners, but always follow the manufacturer’s instructions and wear gloves to protect your hands during the process.
Sanitizing Your Mouthpiece
Regular sanitization of your trumpet mouthpiece is essential for maintaining proper hygiene and preventing the spread of bacteria that can accumulate during normal playing.
When I’m teaching proper mouthpiece hygiene to my students, I recommend several effective sanitizing techniques that’ll keep your instrument clean and safe to play.
You’ll want to use these methods at least once a week, especially if you share your instrument with others.
- Mix one part white vinegar with four parts warm water in a small container and soak the mouthpiece for 15 minutes
- Use a specialized brass instrument sanitizing solution from your local music store
- Create a solution using 70% isopropyl alcohol and warm water for deep disinfection
- After sanitizing, rinse thoroughly with clean water and dry completely with a lint-free cloth
Common Cleaning Mistakes to Avoid

Many trumpet players accidentally damage their mouthpieces through improper cleaning methods, but I’ve learned these mistakes are easy to avoid with the right knowledge and care.
First, don’t use harsh brushes or improper tools like metal scrapers that can scratch the delicate interior surface of your mouthpiece. I recommend using only soft-bristled brushes designed specifically for brass instruments.
Another common mistake I see is cleaning too infrequently, letting bacteria and debris build up, or going overboard with daily deep cleanings that can wear down the finish.
Additionally, never use boiling water, which can damage the mouthpiece’s plating, and avoid harsh chemicals that weren’t made for musical instruments.
If you’re unsure about a cleaning method, I suggest consulting your band director or a professional instrument repair technician.
Preventive Care and Maintenance Tips
Beyond just cleaning your trumpet mouthpiece correctly, I’ve found that proper preventive care makes a huge difference in keeping it in top condition.
Regular preventive maintenance and good hygiene practices will help you avoid build-up and protect your instrument’s sound quality over time.
Here are my top recommendations for ongoing mouthpiece care:
- Store your mouthpiece in a dedicated pouch when not in use to prevent scratches and protect it from dust
- Rinse your mouthpiece with lukewarm water after each practice session to remove saliva and debris
- Apply a thin coat of slide grease to the mouthpiece shank every few months to prevent sticking
- Inspect the rim and cup weekly for any signs of damage or wear that could affect your playing comfort
Professional Cleaning Options
While basic cleaning at home works well for routine maintenance, professional cleaning services offer specialized treatments that can restore your trumpet mouthpiece to like-new condition.
I recommend seeking out professional cleaning services at your local music shop or through certified instrument repair technicians who use expert maintenance techniques like ultrasonic cleaning baths and specialized polishing tools.
These professionals can remove stubborn buildup, deep-clean hard-to-reach areas, and address issues like corrosion or mineral deposits that home cleaning can’t tackle.
They’ll also inspect your mouthpiece for wear, damage, or alignment issues that might affect your playing.
I’ve found that combining regular home maintenance with annual professional cleanings keeps my mouthpiece in peak condition and helps prevent long-term damage that could impact sound quality.
Storage and Handling Best Practices

Proper storage and handling of your trumpet mouthpiece can greatly extend its lifespan and maintain ideal playing condition.
I recommend implementing smart storage solutions and careful handling techniques to protect your investment. When you’re not using your mouthpiece, keep it in a dedicated case or pouch to prevent scratches and damage.
- Store your mouthpiece in a dry, temperature-controlled environment to prevent corrosion and bacterial growth.
- Always handle the mouthpiece by its rim or outer edges, avoiding contact with the cup’s interior.
- Use a protective pouch or case when transporting your mouthpiece, even for short distances.
- Keep your mouthpiece separate from other metal objects that could scratch or dent its surface.
Following these storage and handling practices will help preserve your mouthpiece’s playing characteristics and guarantee it stays in top condition.
Why It’s Important to Clean Vent Hood Filters (And How Often to Do It)
I’ll never forget the day my kitchen filled with smoke because of a clogged vent hood filter – a wake-up call that changed how I maintain my kitchen. While many of us focus on cleaning counters and appliances, we often overlook these essential filters working silently above our stoves. From preventing fires to maintaining air quality, there’s more to these metal meshes than meets the eye.
Understanding Your Kitchen Vent Hood System

Before you can effectively clean your vent hood filters, you’ll need to understand the basic components of your kitchen ventilation system.
I always remind homeowners that there are several vent hood types, including under-cabinet, wall-mounted, and island models, each designed to capture grease, smoke, and cooking odors from your stovetop.
Your hood’s filters are typically made from either aluminum mesh, stainless steel baffle plates, or charcoal, depending on your model.
I’ve found that most residential kitchens use aluminum mesh filters, which consist of multiple layers that trap grease particles.
The filter material choice matters because it affects both cleaning methods and frequency.
When I inspect vent hoods, I look for these filters directly above the cooking surface, where they’re usually mounted in easily accessible slots.
Signs Your Vent Hood Filters Need Cleaning
While your vent hood filters might appear clean at first glance, several telltale signs indicate it’s time for a thorough cleaning. I’ve noticed that many homeowners miss these vital indicators until their kitchen ventilation becomes compromised.
| Warning Sign | What It Means |
|---|---|
| Visible Drips | Grease buildup is starting to form droplets |
| Sticky Surface | Accumulated residue on filter surface |
| Reduced Airflow | Clogged filters restricting proper ventilation |
| Unusual Noise | Fan working harder due to blockages |
| Bad Odors | Trapped grease and debris causing smells |
When you’re cooking and notice smoke lingering longer than usual, that’s your hood telling you it needs attention. I always remind my readers that maintaining clean filters isn’t just about efficiency – it’s essential for preventing potential fire hazards from excessive grease buildup.
Health and Safety Risks of Dirty Filters
Since dirty vent hood filters pose serious risks to your family’s wellbeing, I need to emphasize the dangers that can develop in your kitchen.
When grease and debris accumulate in your filters, they create serious health hazards by allowing harmful particles to circulate through your home’s air.
I’ve seen how these contaminants can trigger allergies, respiratory issues, and headaches in both adults and children.
What’s even more concerning are the fire risks that build up over time. As grease collects in those filters, it becomes highly flammable, and I’ve heard too many stories of kitchen fires starting this way.
Without proper cleaning, your vent hood can’t effectively remove cooking fumes, smoke, and airborne particles, leaving you and your loved ones exposed to poor indoor air quality.
Recommended Cleaning Frequency Guidelines

Regularly cleaning your vent hood filters is essential for maintaining a safe, efficient kitchen environment, and I recommend following a schedule based on your cooking habits.
For light cooking (1-2 meals daily), I suggest cleaning your filters monthly, while moderate cooking (2-3 daily meals) requires bi-weekly cleaning. If you’re cooking heavily or commercially, you’ll need to clean weekly.
Different filter types have specific cleaning needs – mesh filters typically need more frequent attention than baffle filters.
I’ve found that restaurants and commercial kitchens should stick to daily or weekly cleaning schedules, while home kitchens can usually manage with monthly cleanings.
However, if you notice visible grease buildup or reduced ventilation performance, don’t wait for your scheduled cleaning – tackle it right away.
Step-by-Step Filter Cleaning Process
The basic cleaning process for vent hood filters involves three main phases: soaking, scrubbing, and drying.
I’ll walk you through each step to guarantee you’re cleaning your specific filter type safely and effectively.
First, I recommend filling your sink with hot water and dish soap, then submerging your filters for 15-20 minutes to loosen built-up grease.
While they’re soaking, I gather my cleaning tools: a non-abrasive scrub brush, degreaser, and protective gloves.
Once soaked, I gently scrub each filter with the brush, paying special attention to corners and mesh sections.
For stubborn spots, I apply degreaser directly to the problem areas.
Finally, I rinse each filter thoroughly with hot water and let them air dry completely before reinstalling.
Professional vs. DIY Filter Maintenance
While many homeowners prefer tackling filter maintenance themselves, professional cleaning services offer distinct advantages that I’ve found worth considering for long-term hood care.
I’ll tell you that DIY techniques, like soaking filters in hot water and degreaser, can work well for routine cleaning, but professional services provide deeper cleaning with industrial-strength solutions and equipment.
When I’ve used professionals, they’ve caught issues I might’ve missed, like warped mesh or damaged corners that could affect performance.
If you’re comfortable with basic maintenance, I recommend alternating between DIY cleaning and professional servicing every six months. This approach helps you save money while ensuring your filters get the thorough cleaning they need.
Just remember, whether you choose DIY or professional methods, regular maintenance is key to kitchen safety.
Extending the Life of Your Vent Hood Filters

Beyond choosing between DIY and professional cleaning, I’ve learned several smart habits that can dramatically increase how long your vent hood filters last.
To maximize filter longevity, I recommend running your fan for an extra 10-15 minutes after cooking, which helps clear lingering grease particles before they settle.
My top maintenance tips include gently scraping off excess grease before it hardens, avoiding harsh chemical cleaners that can corrode the mesh, and installing a pre-filter screen to catch larger particles.
I’ve found that storing spare filters properly – in a dry place away from cleaning supplies – prevents premature deterioration.
Remember to check your filters monthly for damage, and don’t wait until they’re completely clogged before cleaning them, as this puts extra strain on your ventilation system.
Common Mistakes to Avoid When Cleaning Filters
Since maintaining vent hood filters requires careful attention, I’ve noticed many people making preventable mistakes that can damage their filters or reduce cleaning effectiveness.
I want to help you avoid these common pitfalls when cleaning your filters.
Here are the key mistakes to watch out for:
- Using harsh cleaning solutions that can corrode the filter material – stick to gentle degreasing soaps or baking soda solutions instead.
- Scrubbing with abrasive materials like steel wool, which can scratch and damage the filter’s mesh surface.
- Not letting the filter completely dry before reinstalling it, which can lead to mold growth and unpleasant odors.
Tips for Maintaining Optimal Filter Performance
After properly cleaning your vent hood filters, I’ve found several essential maintenance practices that’ll help keep them working at peak performance for years to come.
To maintain peak filter performance, I recommend inspecting them monthly for damage, replacing them immediately if you spot any holes or tears, and marking your calendar for regular cleaning dates.
I’ve learned that positioning your cooking pots and pans directly under the hood vent makes a big difference in filter efficiency.
Additionally, I suggest wiping down the filter’s exterior weekly with a damp cloth to prevent grease buildup, and checking that all filter clips and brackets are secure.
If you’re using disposable filters, I strongly recommend changing them every three to four months, even if they don’t look particularly dirty.
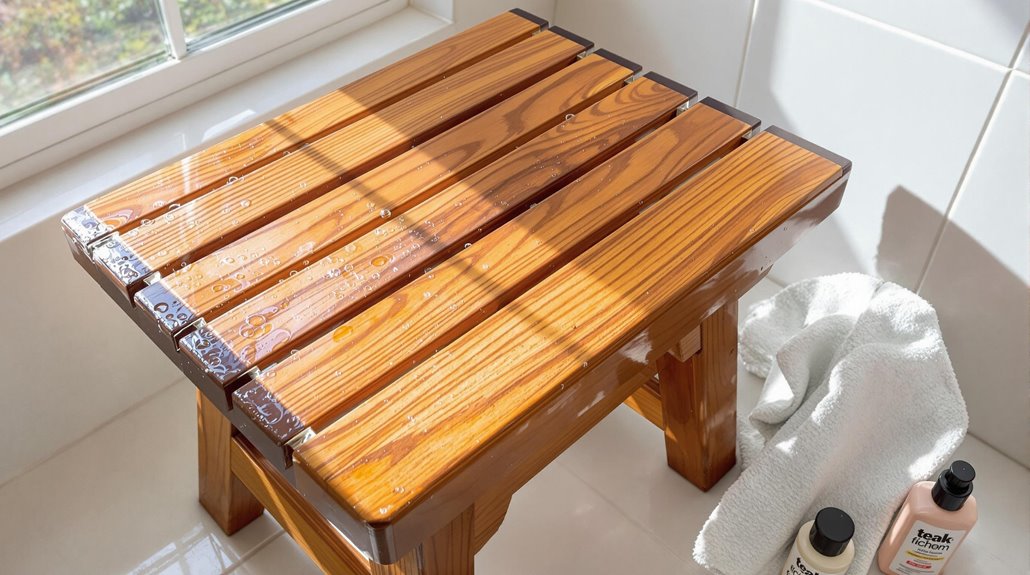
How to Clean a Teak Shower Stool and Prevent Mold
Picture your beautiful teak shower stool slowly deteriorating from mold and mildew – it’s a common problem I’ve faced with my own bathroom furniture. I’ve learned that keeping teak furniture clean and mold-free isn’t just about occasional scrubbing; it requires a strategic approach combining proper cleaning techniques and preventive maintenance. Through years of trial and error, I’ve discovered the most effective methods that’ll help you protect your investment and extend its lifespan.
Understanding Mold Growth on Teak Shower Furniture
While teak is naturally resistant to moisture, it’s still vulnerable to mold growth when exposed to the constant humidity of your shower environment.
I’ve found that mold typically starts growing in the crevices and joints of teak furniture, especially where water can pool and stagnate.
Despite teak’s impressive durability, I want you to understand that mold prevention requires regular maintenance and proper airflow.
When I inspect shower stools, I often notice black or green spots forming on the underside first, where ventilation is poorest.
You’ll need to pay special attention to these hidden areas, as they’re most likely to develop problems.
I recommend lifting your stool between uses to let air circulate underneath, which helps maintain the wood’s natural resistance to fungal growth.
Essential Cleaning Supplies and Tools
Proper teak cleaning starts with gathering the right supplies, and I’ve found that having everything ready makes the job much simpler.
Before you begin cleaning your teak shower stool, I recommend organizing your essential supplies and cleaning tools in one accessible spot near your work area.
- Soft-bristled brush or non-metallic scrubbing pad to avoid scratching the wood
- Mild teak cleaner or a mixture of gentle dish soap and warm water
- Clean microfiber cloths or soft cotton rags for drying
- Rubber gloves to protect your hands from cleaning solutions
- Spray bottle for applying cleaning solution evenly
I always make certain to keep these items separate from harsh bathroom cleaners, as strong chemicals can damage teak’s natural oils and protective properties.
Having the right tools ready guarantees you’ll clean your stool safely and effectively.
Step-by-Step Deep Cleaning Process
The deep cleaning process for your teak shower stool follows five essential steps that I’ll walk you through in detail.
First, I’ll have you rinse the stool thoroughly with warm water to remove surface debris and soap residue.
Next, using gentle cleaning techniques, apply a mixture of mild soap and water with a soft-bristled brush, scrubbing in the direction of the wood grain.
For stubborn stains or mildew, I recommend creating a paste with baking soda and water, letting it sit for 10 minutes.
After cleaning, rinse everything completely – this is vital for proper teak care.
Finally, let your stool air dry in a well-ventilated space, away from direct sunlight, which I’ve found helps prevent warping and maintains the wood’s natural oils.
Natural Cleaning Solutions for Teak Wood

Since teak wood responds beautifully to natural cleaning solutions, I’ve found several eco-friendly options that work wonders for routine maintenance.
When you’re looking to clean your teak shower stool safely, I recommend using gentle ingredients from your kitchen instead of harsh chemicals.
- Mix equal parts white vinegar solution and warm water for a natural disinfectant that won’t damage the wood’s oils.
- Create a paste using baking soda and water to tackle tough stains without scratching.
- Use freshly squeezed lemon juice to naturally brighten the wood while killing bacteria.
- Apply a light coat of food-grade mineral oil or teak oil after cleaning to maintain moisture resistance.
- Make a gentle scrub with coarse salt and water for deep cleaning without chemicals.
Preventive Maintenance Tips and Schedule
Regular maintenance of your teak shower stool doesn’t need to be complicated, but I’ve learned that following a consistent care schedule will extend its life considerably.
I recommend implementing these preventive measures after each shower: wipe down the stool with a clean, dry cloth and leave it in a well-ventilated area to dry completely.
For your maintenance schedule, I suggest a weekly cleaning with mild soap and water, followed by thorough drying.
Every month, I want you to inspect the stool for any signs of mold, mildew, or water damage, particularly in the joints and corners.
Every six months, apply a thin coat of teak oil to protect the wood and maintain its natural beauty.
Restoring Weathered or Moldy Teak
Despite your best maintenance efforts, teak shower stools can sometimes develop signs of weathering or mold growth that require more intensive restoration.
I’ve found that restoring weathered teak involves careful surface sanding followed by thorough teak oiling to bring back that warm, golden glow.
- Start with medium-grit sandpaper (120-150) to remove surface damage and gray patches
- Sand in the direction of the wood grain to avoid creating scratches
- Clean off all dust with a tack cloth before applying teak oil
- Apply thin coats of teak oil using a lint-free cloth, allowing each coat to dry
- Test a small area first to verify there’s no adverse reaction with the wood
Once you’ve completed the restoration process, your teak shower stool should look rejuvenated and be ready for regular use again.
Best Practices for Long-Term Teak Protection
While maintaining a teak shower stool might seem challenging, I’ve found that following a few key protection practices can keep it looking beautiful for years to come.
I recommend applying a high-quality teak oil every 2-3 months to maintain the wood’s natural moisture barrier and prevent water damage.
For shower stools that sit near windows, I always suggest positioning them away from direct sunlight or applying a UV-protective finish to prevent fading and discoloration.
I make sure to keep my stool elevated on non-slip feet when not in use, allowing proper air circulation underneath.
Additionally, I’ve learned that quick-drying the stool with a microfiber cloth after each use helps prevent water from seeping into the grain, extending its lifespan considerably.